In this guide, let us take a closer look at the Car Stereo Wiring with the help of the wire color guide, replacing the old stereo with a new one and also a simple aftermarket Car Stereo Wiring Diagram.
Purchase a New Car Stereo
If you are planning to upgrade your car stereo, then spend some time visiting car accessory stores and also do some research online. There are several brands such as Sony, Kenwood, Pioneer, JBL, Apline, JCV and many more. Shortlist a couple of them and if possible, try to get a demo from a store. Some store owners tend to have a sample setup for testing stereos, speakers and subwoofers. If you are lucky and you have access to a demo, then it will definitely help you in making a purchase. Most new car stereos come with all the necessary wires, adapters and accessories. You will also get a Car Stereo Wiring Diagram either printed on the stereo itself or on a separate paper.
Remove Old Stereo
Next, we are ready to remove the old stereo from our car. The first and important step while removing the existing stereo is to disconnect the battery. Usually, car’s battery is located under the hood, in the engine bay. You don’t have to completely disconnect or remove the battery from its position but just loosen the negative terminal and disconnect it by removing the terminal. You can leave the positive terminal as it is. Make sure that the negative cable from the battery is properly tucked away from the negative terminal of the battery so that it doesn’t make any accidental contact. Once we disconnect the battery, we are now ready to remove the old stereo. In most cars, the head unit is covered with a plastic trim, which also might cover the central two AC vents. Remove the plastic trim using a spudger, preferably a plastic one so that you don’t damage the trim. You will now have access to the head unit. Now, depending on the model, the head unit in your car will be mounted either using spring clips or bolts. Spring clip mounted head units usually don’t have a plastic trim cover. You have to use a special tool to remove spring clip mounted head unit.
Most modern cars are bolt fitted. So, if you have already taken out the plastic trim cover, you will have access to the bolts holding the head unit in place. Remove those bolts using a screwdriver (Phillips or Flat Head, depending on the type of bolts) and you can easily detach the head unit. Once you remove the head unit, you will have access to the rear wiring. Disconnect all the wiring from the head unit to completely remove the old stereo.
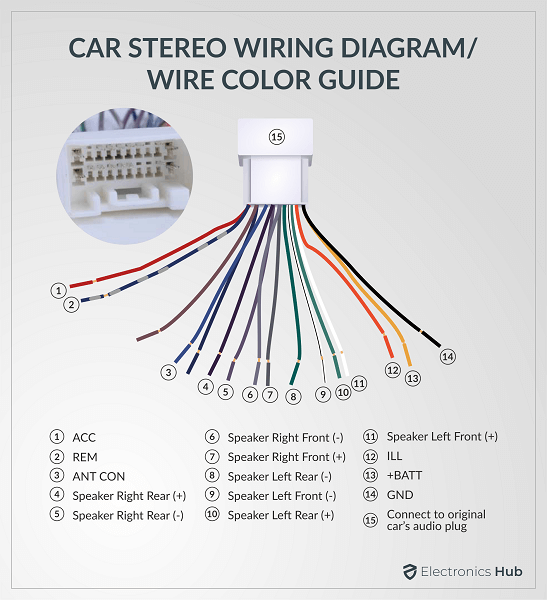
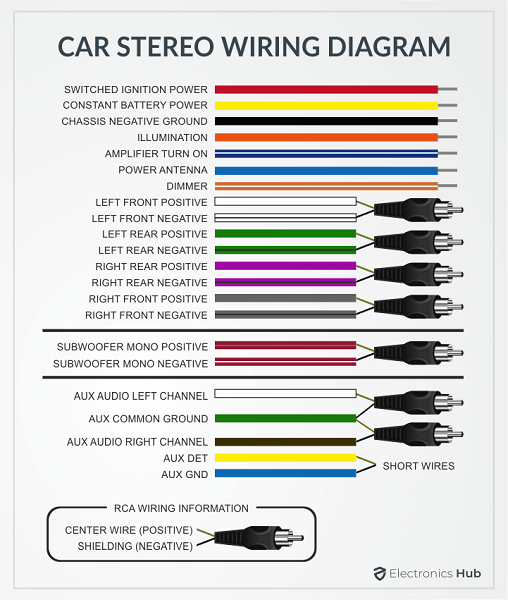
Car Stereo Wiring Diagram / Wire Color Guide
Before looking how to install a new car stereo, let us quickly take a look at a typical car stereo wiring diagram or the Wire color guide. The following table and image show the car stereo wire color guide.
Installing New Stereo
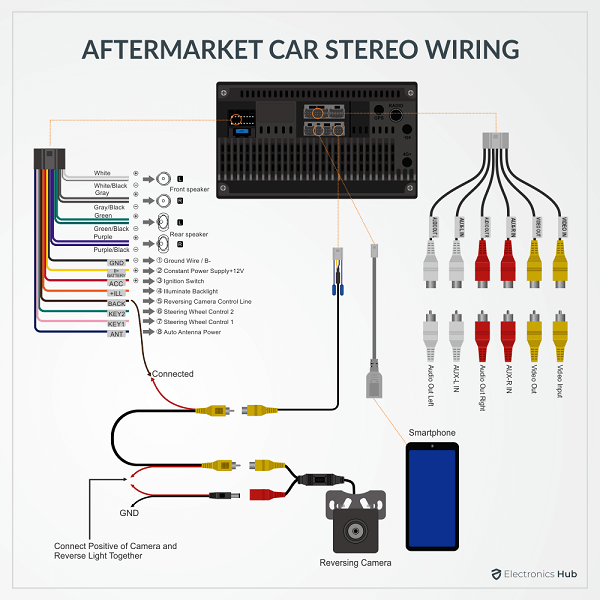
If your old stereo doesn’t have any clips, you might have to purchase a harness adapter to plug in wires into the new stereo / head unit. But if the old wiring comes with clips, you can easily plug them into the new head unit.
In addition to the power and speakers, you might also have additional clips for antenna, USB port, reversing camera, any lighting etc. Make sure to plug in all the necessary wires and tie any unused wires securely so that they don’t rattle around making irritating noise. Once all the wiring is done, it is time to test the new head unit. Without fully inserting the new head unit, just slide the stereo so that it doesn’t trip over. Now, connect back the negative wire to the battery and start the car. Check if all the new stereo functions are working properly or not. If they are working fine, then you can turn off the car and disconnect the negative wire from the battery. Slowly push all the wiring in to the slot and then slide the new head unit / stereo into its dedicated space. Secure the new stereo using the screws and also reinstall the plastic trim cover. If you are satisfied with all installation, you can now reconnect the negative wire to the battery and enjoy your new stereo.
Conclusion
A simple guide on how to replace an old car stereo with a new one. In the process, we learned the basic car stereo wiring diagram which contains all the important wires and their color codes. If you are an enthusiast and ready to work with your car, you can easily replace the old stereo yourself with some effort. But if you are not comfortable, then look for a good car workshop. The entire job should take just over a couple of hours. Comment * Name * Email * Website
Δ
![]()
![]()
![]()
![]()
![]()

