Moreover, it can be tiring to authenticate each time you log into Windows 10. You also run the risk of locking out your account if you enter the password incorrectly too many times. In Windows 10, this process can be automated and done away with. But if other people have access to your computer then this maybe a less secure option. There are two methods through which you can achieve this – By setting up Auto-login or by Enabling Windows 10 auto login using the Registry Editor.
Setup Auto Login (Easy Method)
First, let us start with the easy method. Setting up auto login can help you bypass authentication whenever you log in.
1. Open Run Dialog Box
First, press the Windows Key and continue holding it. Then, tap on “R” and release the windows key. This will open the Run Dialogue box on your screen. Alternatively, you can also use the quick access menu to find the Run menu. For this, right-click on the “start” button. Now, scroll downwards till you find the “Run” application.
2. Type in netplwiz and click ‘OK’
In the text box of the run command, Next, type “netplwiz” in the Run window. After this, click “OK” the User Accounts pop-up window.
3. Turn Off Password Protection
A new window will open on your screen. The window will display all the listed users on your device. On the top of the dialogue box, you will find the option “Users must enter a username and password to use this computer“. You have to uncheck this feature. Now, click on the “Apply” button.
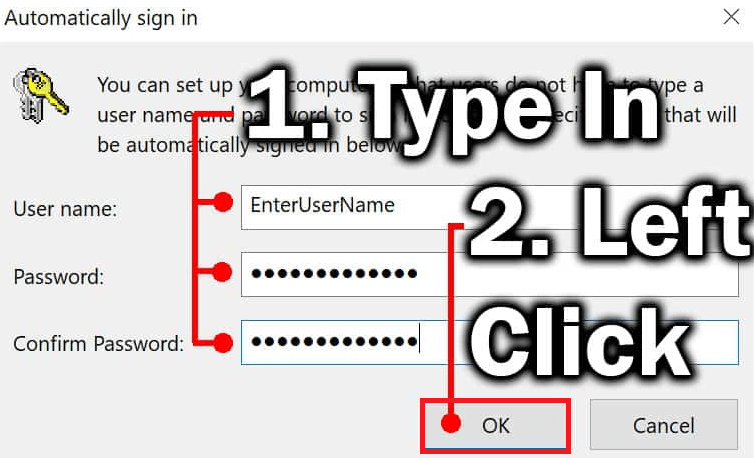
4. Enter your login credentials
A new window will appear on your screen. Here, click on the “OK” button. You will again have to put your username and password to confirm the information. After entering your credentials, click on “ok” once more. You may see the login screen next time you open your device, But you do not need to put your credentials there. The device will allow you to use the auto-login feature from now on.
Enabling Windows 10 auto login using the Registry Editor
If you are comfortable with tweaking the Registry, then you can use this foolproof method. This method involves manually changing a registry key. This could also end up messing with your computer. So before you perform this method, it is highly recommended that you create a system restore point. In case anything gets corrupted, you can also come back to this point.
1. Access Registry
First, open the “Run” from your windows device. You can either use the command “Windows key+R” or open the Run from the Start menu.
2. Open the Registry Editor
You can open the Registry Editor for Windows by launching it from the run command window. Open the Run command window by either pressing the Windows Key + R or by typing “Run” in the search box of the taskbar. After you have launched the run command window, type “regedit” and press OK to launch the Registry editor.
3. Navigate to the Winlogon subkey
In the Registry Editor window, you need to get to the Winlogon subkey. You can do this by expanding the branches of the following option on the left pane: Look for the “Winlogon” key under this branch. Left-click on it and you will get its values on the right pane.
4. Edit the Default username and password keys
Here, you need to look for the value called “Default User Name”. Right-click on the value and select Modify. In the text box for entering value data, type your username. Next, you need to modify the “DefaultPassword” value. In case it doesn’t already exist, you have to create it by following these steps: Step 1. From the menu at the top of the Registry Editor, select Edit Item. Step 2. Click on New and then proceed to select “String Value’ item in the subsequent popup. Step 3. A new entry called DefaultPassword is now present. Right-click on it and click on Modify from the menu.
Step 4. Enter a password in the String Value and click on OK.
5. Create the AutoAdminLogon value if it’s missing
You can create the AutoAdminLogon value in the same way as you have created the DefaultPassword value. Follow the steps given below: Step 1. From the main menu at the top of the window, left-click on “Edit Item”. Step 2. Take your mouse over ‘New’ and click on it. Choose “String Value” from the contextual menu. Step 3. Type “AutoAdminLogon” to create the key and then hit enter to save it. Step 4. Right-click on the newly created key “AutoAdminLogon” and select modify to change its value. Change its value from the current one to ‘1’. Select OK to save this.
6. How to Turn On Auto-Lock in the Windows 10
First, open settings. Next, click on “Accounts.” After this, click on “Sign-in options. Now, open the “Dynamic Lock” & tick “Allow Windows to automatically lock the device when away.” You can now unlock your device using your mobile as the Dynamic Lock feature also works with Bluetooth.
7. Create AutoAdminLogon value if it is missing
First, left-click on “Edit” and hover the mouse pointer over “New”. Next, click on “String Value”. A new pop-up box will appear on your screen. In the box, type “AutoAdminLogon” for the value and click Enter. After this, right-click on the “AutoAdminLogon” value to find the item “Modify”. Here put the value “1” in the value box. Finally, click “OK”.
8. Close and restart
Finally, you can get rid of the authentication process now. However, whenever you modify the registry settings, you need to restart your system. Therefore, after saving and closing the Registry Editor, restart your computer to complete the process.
Conclusion
Auto login is a great automation feature for single users. It saves a lot of unnecessary time and effort, especially if you need to restart or log-in and log-off several times in a row. However, you need to be extra careful in case you have a mobile device like a laptop or if your PC is accessed by multiple people. This is because the entire process will leave your account’s security in a vulnerable state. So make sure you want this setting on your computer before you get it. Comment * Name * Email * Website
Δ
![]()
![]()
![]()


![]()
![]()

